You can buy an excellent LED bulb, install it in a housing that’s perfectly suited to it, and still end up with a beam full of dark patches and stray glare — all because the bulb went in rotated the wrong way. It’s the single most common installation mistake, and it’s easy to make because most bulbs will physically seat fine in either orientation. Nothing feels wrong. The beam just quietly doesn’t work.
Here’s how to get it right, described in a way that doesn’t leave room for guessing.
The orientation rule, stated unambiguously
Most automotive LED bulbs put their chips on two flat faces on opposite sides of the bulb body. Those two faces need to end up pointing at the left and right walls of the headlight housing — toward the sides of the car, not toward the sky and the ground.
The clearest way to picture it: stand in front of the car looking at the headlight. If you could see the bulb inside, the two light-emitting faces should be at the 3 o’clock and 9 o’clock positions on a clock face. The thin edge of the bulb points up and down; the wide, glowing faces point sideways.
A common source of confusion is that guides describe this using three different reference points at once — “horizontal,” “vertical,” “90 degrees” — without saying relative to what. Skip all of it and use the clock-face check, because it only has one possible reading.
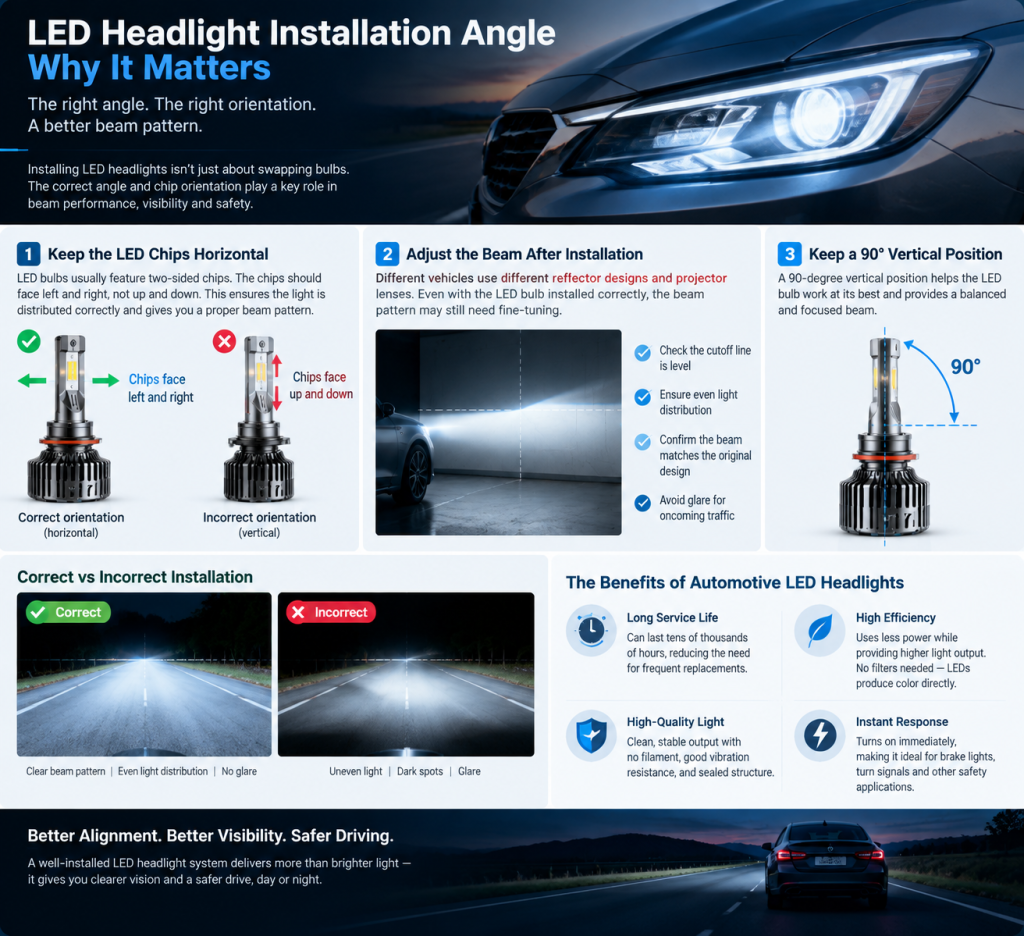
Why it matters: your housing’s reflector or lens was designed around a halogen filament, which sits as a small horizontal line in the middle of the bulb. Chips facing left and right come closest to reproducing that shape and position. Rotate the bulb 90 degrees so the chips face up and down, and you’ve moved your light source somewhere the optics were never designed to collect from — the result is uneven distribution, dark spots where you need light, and spill where you don’t.
Correct orientation isn’t the end of the job
Even with the chips oriented properly, the beam may still need aiming. Reflector geometry and projector lens design vary between vehicles, so a correctly-installed bulb doesn’t automatically produce a level cutoff line.
Worth being precise about how you fix this, because it’s where a lot of guides go wrong: you do not rotate the bulb to fine-tune the beam. Once the chips are at 3 and 9 o’clock and the retaining clip is locked, that’s the bulb’s job done. Beam direction is corrected with the adjustment screws behind the headlight housing — one controlling vertical aim, one controlling horizontal. Treating bulb rotation as an aiming method just trades a correct light source position for a slightly different wrong one.
To check your work properly, park about 7.6 meters (25 feet) from a flat wall or garage door on level ground, mark the height of your headlight centers on the wall with tape, and look for:
a sharp, level cutoff line rather than a smeared gradient
the cutoff sitting at or just below your reference marks
even coverage with no obvious bright blobs or dark gaps
both headlights matching each other in height and intensity
Adjust with the screws in small increments, rechecking after each turn rather than cranking and hoping.
If the beam still looks wrong
At that point, the problem usually isn’t the bulb or the aim — it’s the housing. A reflector-bowl headlight with no projector lens was optically built around a halogen filament, and some of them simply won’t produce a clean beam with any plug-in LED bulb, no matter how well you orient and aim it. That’s a mismatch between the light source and the optics, not something adjustment can fix. A projector or bi-LED retrofit is the version of this upgrade that actually works in that case.
Bottom line
A brighter bulb doesn’t get you better visibility on its own — beam control does, and beam control starts with where the light is coming from inside the housing. Get the chips to 3 and 9 o’clock, verify the cutoff against a wall, and use the aiming screws (not the bulb) to correct anything that’s off. Those three steps are most of the difference between an LED upgrade that works and one that just looks impressive from outside the car.