Upgrading to LED headlights is one of the most effective ways to improve nighttime visibility and driving safety. However, simply installing a brighter bulb is not enough.
Proper installation and beam adjustment are critical. Incorrectly installed LED headlights can create poor beam patterns, reduce road visibility, or produce excessive glare that affects other drivers.
This guide explains how to install LED headlights correctly and adjust the beam pattern for the best performance.
Part 1: How to Install LED Headlights Correctly
Step 1: Access the Headlight Housing
Open the hood and locate the rear section of the headlight assembly.
Remove the protective rubber or plastic dust cover to access the factory bulb.
Before installation:
Turn off the vehicle
Switch off the headlights
Allow the original bulbs to cool down
Step 2: Remove the Original Bulb
Disconnect the factory wiring connector.
Depending on the vehicle model, the bulb may be secured by:
A metal retaining clip
A locking ring
A twist-lock mechanism
Carefully release the locking system and remove the original bulb.
Step 3: Install the LED Mounting Collar First
Many LED headlight bulbs use a removable mounting collar.
Before installing:
Hold the LED bulb firmly
Rotate the bulb body counterclockwise
Separate the mounting collar from the LED bulb
Install the collar into the original headlight socket
Secure it with the factory retaining clip
This creates a stable base for the LED bulb.
Step 4: Insert and Lock the LED Bulb
Insert the LED bulb body into the installed mounting collar.
Twist the bulb until it locks securely.
Important Installation Tip:
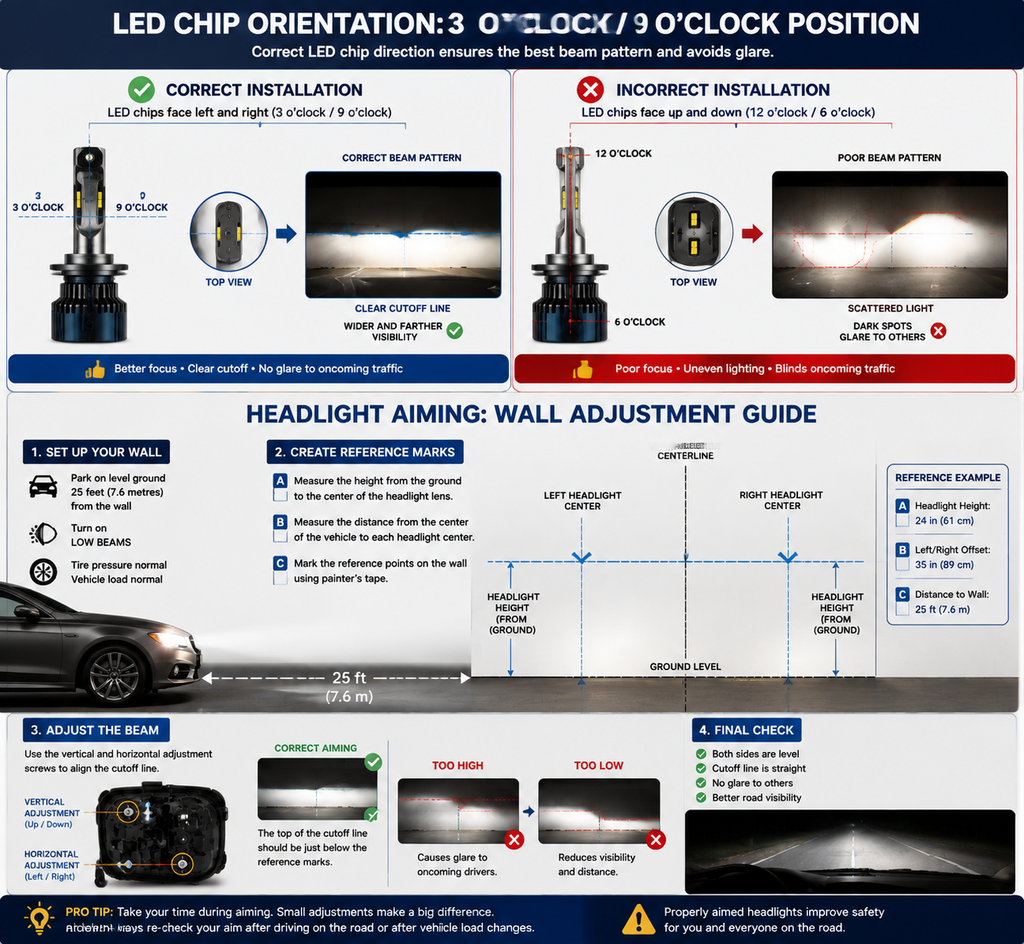
The LED chips should normally face:
3 o’clock and 9 o’clock positions
(left and right horizontally)
This allows the LED bulb to reproduce the original halogen bulb’s light position and creates a cleaner beam pattern.
Incorrect positioning may cause:
Scattered light
Uneven illumination
Excessive glare
Step 5: Connect Wiring and Manage the Driver
Connect the LED driver module to the factory harness.
Carefully organize:
Driver location
Extra wiring
Connectors
Avoid placing components where they may:
Touch hot surfaces
Block ventilation
Prevent the dust cover from sealing properly
Good heat management is essential for LED lifespan.
Step 6: Seal and Test the Installation
Reinstall the dust cover to prevent:
Moisture intrusion
Dust contamination
Condensation inside the housing
Turn on the headlights and check:
✅ Both sides illuminate
✅ No flickering occurs
✅ No dashboard warning appears
✅ Cooling system works properly
Part 2: How to Properly Aim LED Headlights
Even a high-quality LED headlight system will not perform correctly without proper alignment.
Correct aiming ensures:
Maximum road visibility
Clear beam cutoff
Minimal glare for other drivers
Step 1: Prepare a Wall Test Area
Park your vehicle on a flat surface facing a vertical wall.
Recommended distance:
25 feet (7.6 meters)
Turn on the low beams.
Make sure:
Tire pressure is correct
Vehicle load is normal
Suspension is at normal height
Step 2: Create Reference Marks
Measure the key reference points:
Low Beam Center Height
Measure the height from the ground to the center of the headlight lens.
Left and Right Beam Position
Measure the distance between each headlight center point and the vehicle centerline.
High Beam Reference
Measure the high beam center position if separate adjustment is required.
Use painter’s tape to mark these reference points on the wall.
Step 3: Adjust the Beam Pattern
Locate the vertical and horizontal adjustment screws on the rear or top of the headlight housing.
Using the appropriate tool:
Phillips screwdriver
Socket wrench
Adjustment tool
Slowly adjust the beam until:
✅ The cutoff line is level
✅ The beam height matches your reference marks
✅ The light stays below other drivers’ eye level
Avoid adjusting the headlights too high. A brighter light does not mean better visibility if it creates glare.
Final Check: Road Test Your LED Headlights
After completing the adjustment:
Drive on a dark road and check:
Road coverage
Beam symmetry
Visibility distance
Glare to other vehicles
A properly installed LED headlight should provide:
✔ Clear road illumination
✔ Comfortable night driving
✔ Better visibility without disturbing others
Final Thoughts
Installing LED headlights is not just about replacing a bulb. The final performance depends on:
Correct installation
Proper LED chip orientation
Accurate beam adjustment
Good heat management
When installed and aimed correctly, LED headlights can significantly improve nighttime driving safety while delivering a cleaner and more professional lighting upgrade.