A brighter headlight does not always mean better visibility.
If your LED headlights are aimed too high, they can blind oncoming drivers. If they are aimed too low, you lose valuable road visibility and end up driving into dark areas.
Proper headlight aiming is the final step that determines whether your LED upgrade actually performs as expected.
With the right adjustment, you can achieve a clean beam pattern, better road coverage, and safer nighttime driving.
Step 1: Prepare Your Vehicle and Set the Reference Point
Before adjusting your LED headlights, make sure the vehicle is positioned correctly.
Park on a Level Surface
Park your vehicle on a flat surface facing a light-colored wall.
Recommended distance:
25 feet (7.6 meters) from the wall
Make sure:
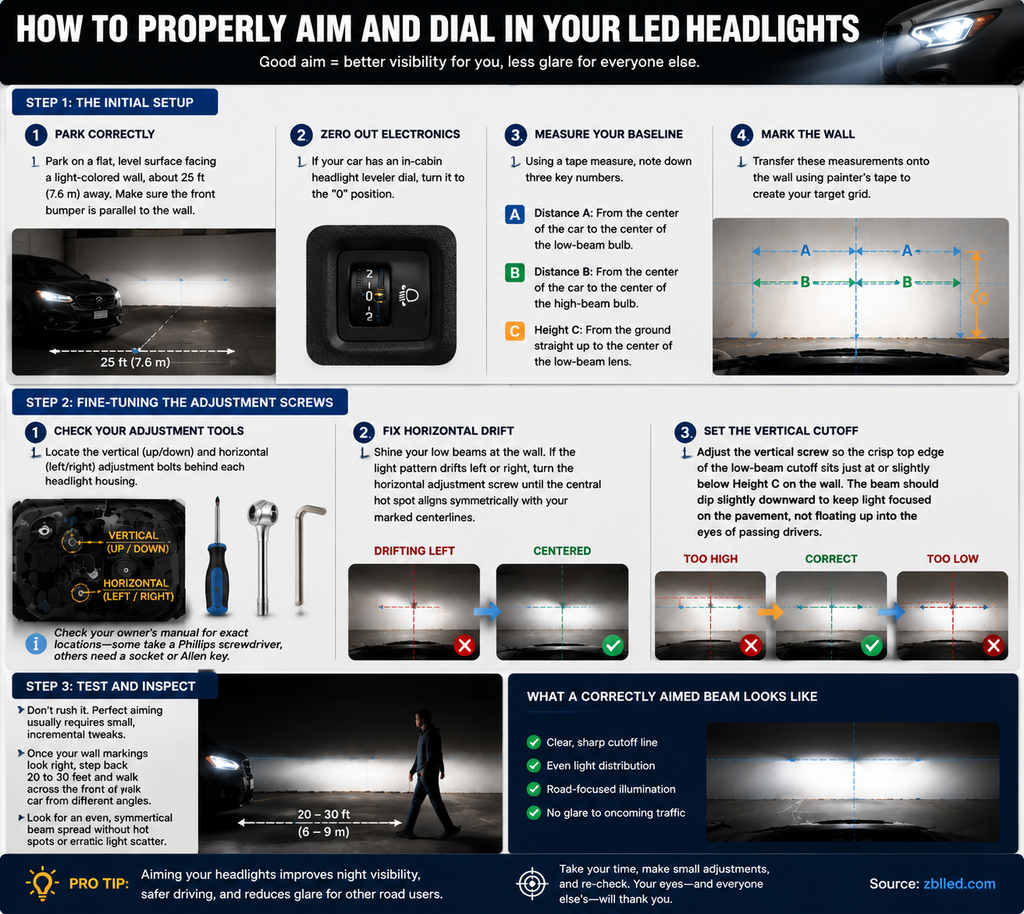
LED headlights https://zblled.com/
The vehicle is parked straight
The front bumper is parallel to the wall
Tire pressure is normal
The vehicle has a typical driving load
A proper setup ensures accurate adjustment results.
Set the Headlight Level Control
If your vehicle has a manual headlight leveling switch inside the cabin, set it to:
Position “0”
This returns the headlights to their standard factory angle before adjustment.
Measure the Headlight Reference Points
Before making adjustments, measure three key dimensions:
Distance A
The distance from the vehicle centerline to the center of the low-beam light source.
Distance B
The distance from the vehicle centerline to the center of the high-beam light source.
Height C
The height from the ground to the center of the low-beam lens.
Transfer these measurements onto the wall using painter’s tape to create your adjustment reference lines.
Step 2: Adjust the LED Headlight Beam Pattern
Once the reference marks are ready, it is time to fine-tune the headlights.
Adjust Horizontal Alignment
Locate the horizontal adjustment screw behind the headlight housing.
Turn the adjustment screw slowly until the beam is centered with your reference markings.
If the beam shifts too far left or right:
It may reduce road coverage
It may create uneven lighting
It may affect visibility around curves
The goal is a balanced beam position.
Adjust Vertical Cutoff Line
The vertical adjustment controls the height of the light beam.
Adjust the cutoff line until it sits slightly below the reference height.
A properly aimed low beam should:
✔ Illuminate the road ahead
✔ Maintain a clear cutoff line
✔ Avoid shining into other drivers’ eyes
Avoid aiming headlights too high. Extra glare does not improve visibility — it only creates a safety risk.
Step 3: Test the Final Lighting Performance
Headlight adjustment requires patience.
Make small changes instead of large movements.
After the wall adjustment is complete:
Step back 20–30 feet
View the beam from different angles
Check for uneven brightness
Look for scattered light or dark spots
A properly adjusted LED headlight should produce:
✔ Sharp cutoff line
✔ Even road illumination
✔ Clear visibility ahead
✔ Minimal glare for other drivers
Final Thoughts
Installing LED headlights is only half of the upgrade process.
Proper aiming is what turns a powerful LED system into a safe and effective lighting solution.
A correctly adjusted headlight provides better nighttime visibility without creating unnecessary glare for other road users.
Take the time to aim your LEDs properly — your eyes, and every driver coming toward you, will appreciate it.