Swapping halogen bulbs for LEDs is one of the cheapest upgrades you can make to your headlights — but “cheap” and “quick” only holds true if your headlight housing is actually built for it, and if you get the orientation right. Get either of those wrong and you’ll end up with a headlight that’s technically brighter but throws light everywhere except where you need it.
Here’s the full picture — including the one check most guides skip.
Before you even open the box: check your housing type
This is the step that gets left out of almost every LED install guide, and it’s the one that matters most.
Projector lens housing (a small round lens sits inside, behind glass): LED bulbs work well here. The lens focuses the light properly regardless of the bulb type.
Open reflector bowl (no lens — you can see the bulb and the silver reflector directly): halogen bulbs are designed with a specific filament shape that the reflector bowl expects. Swap in an LED, and the very different light-emission pattern usually means scattered light, glare for oncoming traffic, and a beam pattern that no longer matches what the reflector was engineered for.
If you’re not sure which one you have, shine a flashlight into the housing from the front. See a lens? You’re generally fine. Just a bowl and a bulb? Don’t install LEDs without also upgrading to a projector lens assembly — otherwise you’re trading “dim but legal” for “bright but blinding everyone else.”
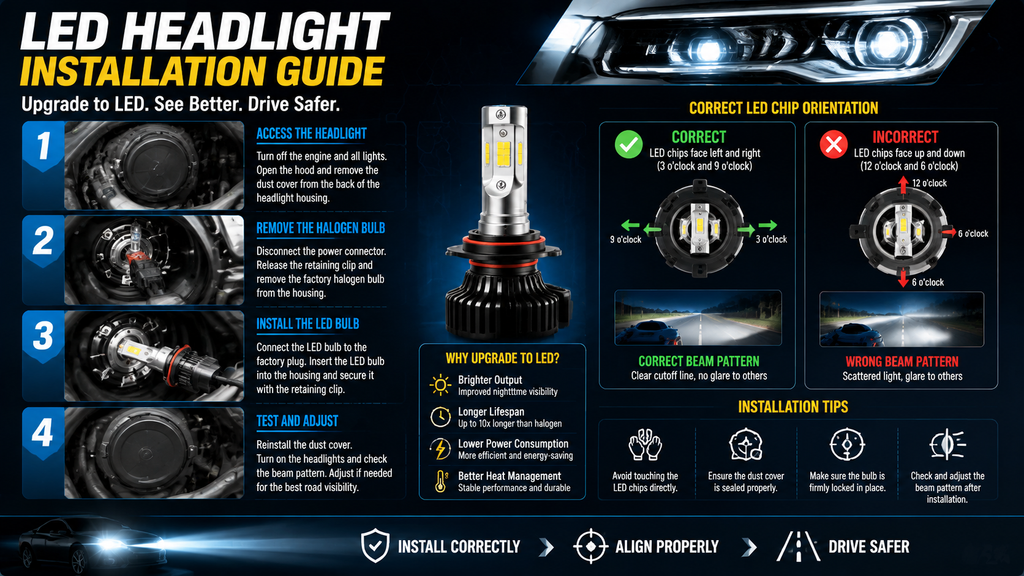
Step 1: Kill the power, get the housing open
Turn off the engine and every light on the car — you don’t want a live circuit while your hands are inside the housing.
Pop the hood and find the rear cover on the headlight assembly (usually a rubber or plastic cap, one each for low beam and high beam). Twist or unclip it — it should come off without tools on most vehicles.
Step 2: Pull the old bulb
Unplug the electrical connector from the back of the halogen bulb first, then release the retaining clip that holds the bulb in the housing. The bulb should come free once the clip is out of the way.
One thing worth repeating even though you’ve probably heard it: don’t touch the glass part of a halogen bulb with bare fingers. Skin oil creates a hot spot on the quartz glass, and that spot can crack or blow the bulb early — sometimes within days.
Step 3: Seat the LED bulb — and get the orientation right
Plug the LED bulb into the factory connector, then fit it into the housing and lock it down with the original retaining clip.
This next part is the detail that separates a good install from a “why does my headlight look weird” install: most automotive LED bulbs have chips mounted on two opposite sides. Those chips need to face left and right — roughly the 3 o’clock and 9 o’clock positions — not up and down. Install it rotated 90 degrees off and the reflector or lens will send light where it wasn’t designed to go: dark patches in some spots, harsh glare in others.
If your bulb’s base has a locking tab or notch, it’ll usually only seat one way — but some universal bulbs let you rotate them freely before locking, so double-check the chip orientation before you snap the clip shut, not after.
Close up the dust cover and make sure it seals — a gap here lets moisture in, and a fogged-up headlight housing is a much bigger headache than a five-minute reinstall.
Step 4: Test it properly before you call it done
Turn the headlights on and confirm both sides light up evenly.
Watch for flickering, and check the dashboard for a bulb-out or CAN-bus warning light — LEDs draw current differently than halogens, and some cars’ electronics flag this as a fault even when the bulb is working fine. (A cheap “canbus decoder” resistor, sold alongside most LED bulb kits, usually clears this.)
At night or in a dark garage, check where the cutoff line falls — it should be sharp, not smeared, and angled slightly down and to the left (in right-hand-traffic countries) so you’re not aiming straight into oncoming eyes.
If the beam looks off, don’t just eyeball an adjustment — use your headlight’s built-in leveling screw (usually accessible from the engine bay, marked with a screwdriver or wrench icon) to bring the cutoff back to spec, rather than twisting the bulb itself.
A couple of things worth knowing before you start
Some vehicles will fail an inspection with LED bulbs in a non-approved housing, even if the light output is otherwise fine — worth checking your local rules if this matters to you.
Prying off dust covers and clips gets easier with practice, but the plastic gets brittle with age. If a clip feels like it’s about to snap, stop and work it more slowly rather than forcing it.
Bottom line
The bulb swap itself takes ten minutes. What actually determines whether the result is “great upgrade” or “why do people keep flashing their brights at me” comes down to two things: whether your housing was built to handle LED light in the first place, and whether the chips are facing the right way. Get those two right, and everything else in this guide is just mechanics.